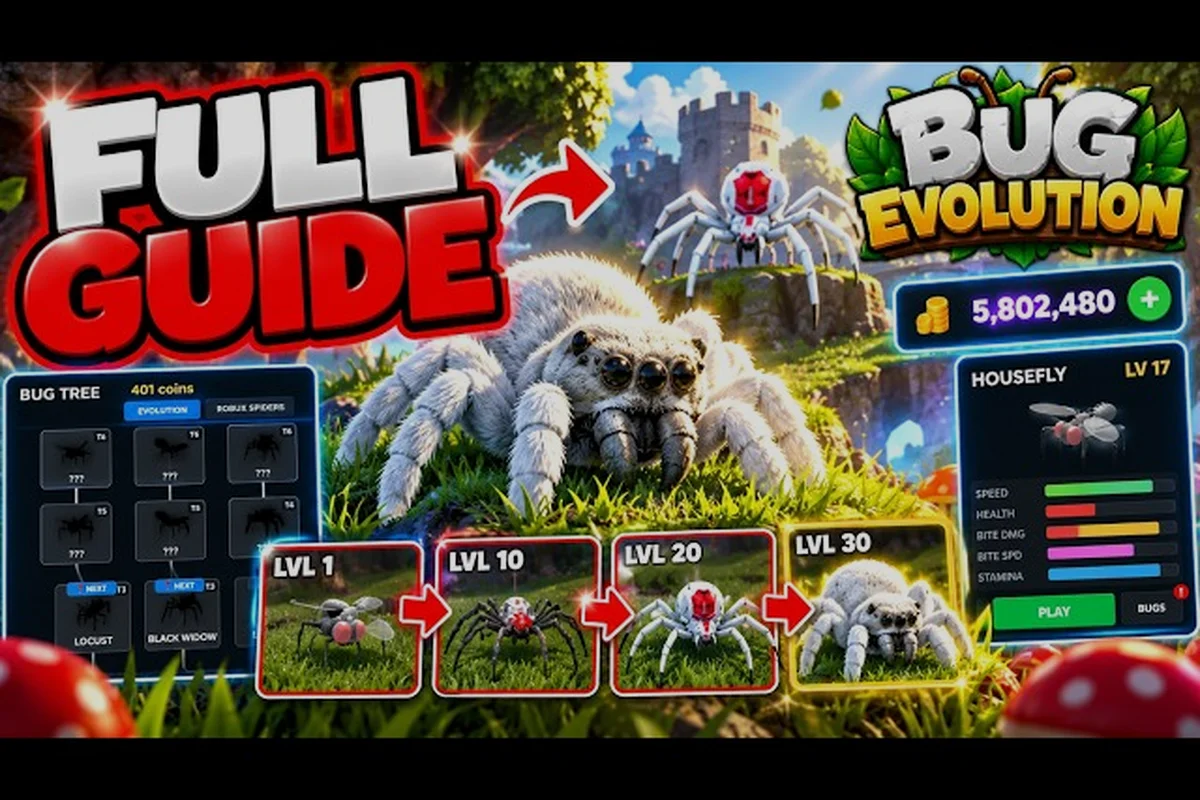
Winning as a solo survivor in Bug Evolution depends on managing the food loop efficiently while using upgrades to strengthen your bug before danger escalates. Take only food fights that improve your position, disengage when health drops instead of trading hits, and preserve enough energy to escape predators. Reaching a stronger form safely can unlock better food access, but rushing evolution leaves you vulnerable; controlled fights create a larger advantage than constant risk.
Bug Evolution How to Win With a Safe Opening
Winning as a solo survivor requires more than eating constantly. You must balance three demands: growth speed, coin reserves, and combat readiness. If you neglect one of them, a stronger insect can interrupt your route, force you to spend Stamina, and expose every later mistake.
The early game follows a clear repeatable loop. Hatch as a tiny spider, collect nearby food in the grassy fields, and use that growth to reach Level 10 and the spider stage. Then purchase an early Bite Damage upgrade before expanding into open areas. The goal is not to fight every target; it is to become strong enough that smaller opponents become optional food.
| Opening priority | Action | Why it matters |
|---|---|---|
| First | Eat the closest small food | Builds growth with minimal risk |
| Early | Reach the spider stage at Level 10 | Unlocks a stronger baseline form |
| After first coins arrive | Buy Bite Damage Level 1 | Prevents early fights from lasting too long |
| Before opening further | Keep a coin reserve | Funds the next evolution or upgrade |
| During combat | Watch Stamina and disengage | Conserves your ability to escape |
This opening sequence reflects community-tested play patterns for the new 2026 release, but the live server population can change quickly. Treat matchup advice as a current strategy rather than a permanent rule: if a normally safe small insect begins contesting your food route, preserve your coin reserve, avoid a Stamina-draining fight, and retreat toward the grass instead of forcing the engagement. Likewise, if stronger insects dominate the map, delay opening further areas until Level 10, the spider stage, and the first Bite Damage upgrade give you a safer foundation.
Eat Small Food Before Taking Risks
Your safest food is usually the food already near your spawn area. Small objects let you maintain a steady growth rhythm without drawing the attention of much larger players. Resist the temptation to run across the map for one valuable piece of food, because the travel time may cost more Stamina than the reward can replace.
A good solo rule is to circle the same patch until it is depleted. You learn where food respawns, reduce the distance between pickups, and avoid entering open ground while your insect is still small. The broader controls are covered in the Roblox beginner guide, but the central principle remains simple: food density beats greed during the opening minutes.
Keep Coins Before Chasing Evolution
Evolving with no coins leaves you vulnerable after changing forms. A new insect may look stronger, but its available upgrades determine how well it performs in a real fight. Save enough currency to improve Bite Damage or Bite Speed immediately after evolving instead of spending every coin on the next unlock.
Community reports consistently identify three opening mistakes: evolving too early without money, traveling into dangerous zones for rare food, and ignoring Bite Speed. You can correct all three by eating consistently, banking coins, and treating longer fights as a reason to improve speed rather than forcing a stamina-draining exchange.
Bug Evolution Survival Guide for Food Routing
A reliable food route is the foundation of this bug evolution survival guide. Because you control one insect, you can create a loop that produces steady growth while limiting exposure to other players. The key is to separate safe farming from opportunistic hunting and treat the transition between the two as a deliberate decision.
Build a Three-Zone Route
Divide the map into a near field, a middle route, and a danger zone. The near field contains dense food and little combat pressure. The middle route connects it to better food but crosses more open space. The danger zone holds large insects or valuable drops that are rarely worth contesting during your first growth cycle.
| Route zone | Best use | Risk level | Suggested action |
|---|---|---|---|
| Near field | Early farming and leveling | Low | Clear completely before moving |
| Middle route | Food variety and coin income | Medium | Travel in arcs, not straight lines |
| Danger zone | Rare food or targets | High | Attack only with a clear escape route |
This zoning prevents you from treating every food source as equally useful. A route can be efficient without being direct, because changing direction lets you monitor threats and preserve momentum. If you need more detail on unlocking forms, the evolution tree guide explains how tiers and level requirements affect available Bug Tree nodes.
Use the HUD as a Route Planner
The interface displays five key bars: Speed, Health, Bite Damage, Bite Speed, and Stamina. Your insect name and level appear alongside the coin total, while the Bugs tab tracks collected forms. These indicators let you evaluate whether a risky trip is worth attempting without relying on visual guesses.
Speed tells you whether you can outrun danger, while Stamina shows how much fighting or sprinting you can afford. Low Stamina is a clear signal to end a fight or rotate toward safer food. Health indicates your current buffer, but waiting until that buffer is gone often means the decision has already become desperate.
Know When to Retreat
Disengaging is not losing a match; it protects your growth. Chase a target only if the chase does not pull you away from several food pickups. If an opponent starts a fight, keep moving unless you can end it with one strong hit. The longer the exchange lasts, the more likely Stamina will decide the result.
A practical retreat sequence is: break contact, preserve Stamina, then rebuild your position before returning to the route. For example, if a larger insect catches you during a pickup, use open space to widen the gap instead of trading hits; after Stamina recovers, circle toward a safe Health buffer and only re-enter the area when nearby food no longer exposes you to a surprise attack. This sequence turns a threatened chase into a controlled reset, preventing one bad encounter from consuming the food and upgrades needed for later fights.
-
Turn away when your Health drops below a safe buffer.
-
Use open space to create distance rather than circling immediately.
-
Eat nearby food only when no larger insect closes in.
-
Return to your route once Stamina and Health recover.
This method works because it turns survival into repeatable mechanics rather than a series of risky decisions. You do not need perfect predictions or aggressive baiting; you need enough nearby food, reliable upgrade opportunities, and multiple escape routes that a missed pickup or failed chase rarely ends the run. For example, collecting a small food cluster before pursuing a larger insect can preserve Health and Stamina for the next route, while leaving one open escape lane prevents an early mistake from forcing an unsafe fight.
Bug Evolution How to Survive Early Combat
Combat is where many early growth routes collapse. A player may have enough coins to evolve but still lack Bite Speed, causing a fight to last several seconds longer than necessary. Every extra second adds damage, drains Stamina, and gives nearby competitors time to arrive.
Decoding the Five Stat Bars
| Stat | Practical use | Solo-player consideration |
|---|---|---|
| Speed | Chasing and escaping | Essential for avoiding unfavorable fights |
| Health | Withstanding damage | Determines how many mistakes you can absorb |
| Bite Damage | Reducing enemy health | Raises the value of a successful hit |
| Bite Speed | Attack frequency | Shortens fights and protects Stamina |
| Stamina | Movement and action endurance | Governs when you must retreat |
These bars should influence your route. A fast insect with weak damage may farm efficiently, while a powerful insect with low Stamina should avoid prolonged engagements. Because the Bug Tree changes your form rather than simply charging a coin fee, compare current and potential stats before committing to an upgrade path.
Buy Speed Before Chasing
The community’s recommended first major purchase is Bite Damage Level 1. It provides an immediate improvement against early opponents without requiring a long farming detour. Bite Speed becomes more valuable after that because shorter fights preserve Stamina and reduce the chance of being trapped by a third player.
For solo play, use this purchase order: prioritize Bite Damage Level 1 first, then add Bite Speed only when combat timing shows that longer exchanges are draining your Stamina. Treat coins as a defensive budget rather than a score to spend immediately—hold back enough for the next useful evolution, and reassess after each meaningful fight. For example, if an early opponent repeatedly survives your first hit and forces a third-player approach, faster Bite Speed can create safer escape windows; if you already win exchanges quickly but take heavy damage, the next purchase should improve damage instead. This order preserves options, delays risky upgrades, and reduces the chance that a single bad engagement consumes your entire coin reserve.
-
Bank enough coins for the next useful upgrade.
-
Buy Bite Damage Level 1 when available.
-
Add Bite Speed if fights regularly drag on.
-
Reassess your form after each meaningful evolution.
-
Keep a small reserve instead of spending every coin immediately.
This ordering turns coins into a defensive system because attack speed and damage solve different survival problems. A player with modest Bite Damage but fast Bite Speed can create repeated hit-and-disengage opportunities, preserving Stamina while avoiding a fight against a high-damage opponent. By contrast, a player with high Bite Damage but slow attacks can be drained during the approach: the opponent’s faster Bite Speed may land another hit before the stronger strike resolves, turning a theoretically stronger form into a losing exchange. For example, if two players have similar coin totals but one prioritizes Bite Speed, that player can disengage after landing a quick hit, whereas the slow, high-damage build may lose Stamina before its payoff attack. The key is to match the upgrade to the failure pattern in your fights—speed when exchanges drag on, damage when opponents survive your opening strike.
Avoid Crowded Upgrade Decisions
A useful rule is to upgrade during a safe farming window rather than immediately after a risky fight. Low Health, low Stamina, and nearby enemies can make a menu decision expensive. Moving to a quiet field first preserves both your resources and your ability to react.
The opening route should also avoid repeated battles with creatures that have no food value for you. Kill only when the reward offsets the Stamina cost. This is especially important before you understand the map’s respawn pattern, because fighting replaces time that could have been spent growing.
Evolution Choices for Solo Players
Your Bug Tree route determines what you become, but the timing of each change matters. The tree contains tiers from T1 through T6, and higher nodes are gated by level and growth requirements. Because a node changes your insect instead of costing coins directly, choosing it creates a short-term reset that should be planned around.
Delay Evolution Until the Route Is Ready
An evolution is strongest when the surrounding plan is already in place. Before selecting a node, confirm that you have food near your current form, understand the next area, and possess enough coins to improve the new insect. Evolving while stranded with no coins can turn a tier gain into a vulnerable period.
| Evolution condition | Recommended response | Risk of ignoring it |
|---|---|---|
| New node available | Delay until food and coins are prepared | Weak form immediately after changing |
| Health or Stamina low | Postpone evolution | No capacity to escape |
| Strong food route found | Consider changing near that route | Long trip without supplies |
| Upgrades nearly affordable | Evolve, then upgrade promptly | Missed power spike |
| Enemy pressure rising | Secure a quiet area first | Evolve during an active chase |
The evolution path guide is useful for comparing requirements, but the solo decision comes down to timing. Your current location, food supply, coins, Health, and Stamina determine whether a node is genuinely an upgrade rather than a temporary vulnerability. For example, if a stronger food route is available but the next insect requires an immediate coin-heavy upgrade, wait near your current form until that cost is covered; evolving first can leave you underpowered and exposed before the new food route is reached.
Choose Progress, Not Appearance
Some nodes may look more impressive without being better for your current route. Compare each form around food availability, escape speed, attack frequency, and durability. A slightly stronger insect that strands you away from food can progress more slowly than a common form with excellent movement.
Prioritize the path that continues your farming cycle. The collection of common houseflies and moths gives you access to more than 30 insect forms over a session, including tarantulas, black widows, and giant prehistoric creatures. However, reaching a dramatic form does not help if you cannot feed, fight, or escape afterward.
Plan the First Minute After Every Change
Treat each evolution as the start of a new local cycle. Immediately identify nearby food, observe whether stronger insects are nearby, and buy the upgrade you can afford. Avoid rushing into open ground just because the new form looks stronger.
A practical post-evolution checklist turns each new form into a survivable operating plan rather than an automatic power spike: compare movement speed, body size, and special ability against the previous form, then pause briefly to confirm that the upgrade actually improves positioning around food clusters and escape routes. For example, if the evolved bug has a faster move speed but a larger hitbox, spend the next few seconds testing a sidestep around a stronger insect instead of charging; the speed gain may be unusable if you cannot dodge cleanly. Preserve enough coins for the next evolution stage, because evolving without a cash reserve can leave the bug unable to recover after an ambush. Stamina should also be treated as part of the combat calculation: a full-health insect with an empty stamina bar cannot reliably escape or contest a kill. Recheck nearby threats before committing to a route, since evolution can shift the chase distance and reveal a new threat boundary. If the new form has a shorter travel radius, abandon a distant food target and select a nearby cluster instead; if its radius increased, use the extra range to reach safer food without entering open terrain. This checklist supports bug evolution how to win by turning each transformation into a controlled reset, while minimizing the risky window created by movement changes, threat escalation, and recovery timers.
-
Food check: Find a safe cluster within the new travel radius.
-
Threat check: Identify larger insects and escape lanes.
-
Coin check: Reserve enough currency for an immediate upgrade.
-
Stamina check: Do not begin a fight while the bar is still recovering.
-
Route check: Continue the same general direction rather than restarting blindly.
Bug Evolution How to Win by Managing the Late Match
Late-match survival often depends less on raw size and more on efficiency. A large insect that spends Stamina in every fight may fall behind a smaller player with a dependable farming loop. Your goal is to become the strongest insect on the server while still having enough resources to protect that position.
Preserve the Farming Engine
Even a powerful form needs food to maintain growth and recover from losses. Continue collecting in your proven zone rather than assuming the open field is automatically better. If your route supplies steady growth, it creates the base on which stronger targets become worthwhile.
| Late-game state | Best decision | Reason |
|---|---|---|
| Strong form, plentiful coins | Seek controlled fights | Upgrades can shorten encounters |
| Strong form, low food | Return to a route | Avoid strength without growth |
| Weak form, excellent route | Keep farming | Outgrow threats safely |
| Many competitors nearby | Wait for separation | Avoid a multi-target collapse |
| Health below half | Recover first | Preserve the current tier |
The late game is not an excuse to stop playing the opening correctly. Food, coins, and Stamina still matter more than a dramatic appearance. If you want a deeper look at income and levels, the coin and XP progression guide expands on efficient farming.
Choose Targets With a Clear Reward
Before attacking, identify what the target offers: food, coins, experience, or simply removal from a threat. A target that gives little but demands a long chase is usually a bad trade. A faster opponent may be worth attacking only if your Speed and Stamina leave you with a safe margin.
Use circling movement to judge the opponent’s response. If they immediately turn toward you, they may be stronger or willing to fight. If they continue farming, consider a brief attack before they escape. The goal is not to prove superiority; it is to collect resources without allowing the fight to become a stamina test.
Know When the King Title Is Secure
The session’s stated objective is to become King of the Server, the strongest player in a 15-player lobby. That means power, size, and combat performance all contribute to your position. You do not need to challenge every nearby player, because maintaining growth while others exhaust themselves can be enough.
Keep upgrading only when the purchase improves your ability to farm or survive. An extra coin sink can be less valuable than the earlier attack-speed upgrade that prevents repeated damage. Measure each choice by the result it produces in practice, not by the number displayed on the menu.
Practical Bug Evolution How to Survive Checklist
The fastest route to a strong finish is a clean routine. Eat close food, upgrade before a crisis, evolve with a plan, and leave fights when the expected reward falls short. The following checklist compresses the complete strategy into repeatable actions.
Before the First Fight
-
Eat the closest small food until the first evolution is available.
-
Reach the spider stage at Level 10.
-
Bank coins instead of spending every point immediately.
-
Buy Bite Damage Level 1 when possible.
-
Learn where Health and Stamina sit on the HUD.
During Mid-Game Farming
-
Use a three-zone route made of safe, medium, and dangerous ground.
-
Circle dense food areas rather than taking straight lines.
-
Add Bite Speed when fights begin draining Stamina.
-
Avoid rare food when Health or Stamina is low.
-
Enter the Bug Tree only after checking nearby enemies.
Before the Final Push
-
Return to a proven food route if your growth has stalled.
-
Fight only when the reward covers the Stamina cost.
-
Keep a coin reserve for immediate post-evolution upgrades.
-
Break away from crowded areas instead of starting a group battle.
-
Reassess your form based on practical survival, not appearance alone.
This bug evolution how to survive routine works because it protects the resource chain that produces power. Food creates growth, coins create upgrades, upgrades improve fights, and smart retreats keep all three intact. That chain is more valuable than winning one risky encounter.
Frequently Asked Questions
Can you win Bug Evolution without a team?
Yes, but solo play demands tighter route control and earlier upgrades. Focus on dense food, keep a coin reserve, and avoid fights that drain Stamina. Team play can divide coverage and share pressure, yet a disciplined solo player can still grow steadily by choosing safe targets and preserving Health.
What is the best first upgrade in Bug Evolution?
Community guidance generally recommends Bite Damage Level 1 after the opening food cycle because it improves your earliest fights immediately. Add Bite Speed when encounters last long enough to drain Stamina. Compare purchases with the coin and XP progression guide to choose upgrades that support your route.
Should you evolve immediately when a Bug Tree node unlocks?
Not always. Evolve when you have nearby food, enough coins for an immediate upgrade, and a safe area to recover. Changing form resets your current position and may leave you exposed. If you are low on Health or surrounded, postpone the change until the route is stable.
How do you avoid losing fights in Bug Evolution?
Choose fights with a clear exit, watch the Stamina bar, and retreat while Health remains above a safe buffer. Avoid prolonged exchanges because Bite Speed and Stamina determine whether you can finish. If the target offers little food or coins, leave it alone and continue collecting.
What is the safest way to reach King of the Server?
Reach it by combining reliable growth with selective combat. Keep a productive farming loop, improve Bite Damage and Bite Speed, and evolve when the next form fits your route. The strongest player is not always the one who fights most; preserving resources can leave you larger and better prepared when a decisive fight arrives.